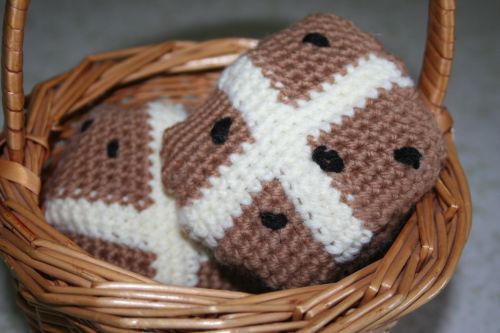
With Easter fast approaching, I wanted to make a few little gifts for my Sunday School class. I teach pre-k and have two students – one of which is my daughter. I wanted it to be something with religious meaning. I decided to crochet hot cross buns. After not finding a crochet pattern, I decided to chart a cross and go from there.
I tried a few different techniques and like binding off after each row the best. It gives the best definition of the cross. The downside is that you have a lot of loose yarn ends. I wrote down my pattern and hopefully, it is somewhat legible. If anything is unclear, just let me know.
Hot Cross Buns Crochet Pattern
Yarn: Medium Worsted Weight- tan and cream colors
Hook: size F (3.75mm)
Begin with a chain of 24 with the tan yarn.
Row 1: SC into 2nd chain from hook and into the next 9 for a total of 10. Switch to cream color. SC into next three. Switch back to tan for the remaining 10 stitches. So your first row will have 10 SC in tan, 3 SC in cream, and 10 SC in tan. Bind off.
Row 2-10: Join tan yarn in first SC of row. SC into first sc and into the next 9. Then switch to cream for next 3 SCs. Switch back for the last 10. Bind off *Repeat row 8 more times.
A note about switching colors: On the last stitch of a color before swapping, pull through the color so you have two loops on the hook. Then yarn over with the new color and complete the SC.
Switch to cream color
Row 11-13: With cream color, SC each row and bind off after each completed row.
Row 14-22 – Join tan yarn in first SC of row. SC into first sc and into the next 9. Then switch to cream for next 3 SCs. Switch back for the last 10. Bind off *Repeat row 8 more times.
For the back piece:
SC 2, six SC into second chain from hook. (6 SC)
Rnd 2: 2 SC into each SC. (12 SC)
Rnd 3: 2 SC into the first stitch, one SC into the next stitch. * 2 SC into the next stitch followed by SC into the next stitch .* * Repeat for the round (18 SC)
Rnd 4: 2 SC into the first stitch, SC into the next two stitches. * 2 SC into the next stitch followed by SC into the next two stitches.* * Repeat for the round (24 SC)
Rnd 5: 2 SC into the first stitch, SC into the next three stitches. * 2 SC into the next stitch followed by SC into the next three stitches.* * Repeat for the round (30 SC)
Rnd 6: 2 SC into the first stitch, SC into the next four stitches. * 2 SC into the next stitch followed by SC into the next four stitches.* * Repeat for the round (36 SC)
Rnd 7: 2 SC into the first stitch, SC into the next five stitches. * 2 SC into the next stitch followed by SC into the next five stitches.* * Repeat for the round (42 SC)
Check the back piece to see if it is large enough. If not, add around 8:
(optional) Rnd 8: 2 SC into the first stitch, SC into the next six stitches. * 2 SC into the next stitch followed by SC into the next six stitches.* * Repeat for the round (48 SC)
Join the two pieces with the right side facing out. Use a whip stitch. You will have to gather a little of the square at the corners to make it fit into the circle. Once you get most of it sewn together, stuff it. Then continue to close it up.
Take a little black yarn to make the embellishments at the top.
